 First, a template is used to cut conditioned clay into a conic spout-shaped form. The clay is softer than what I use for most handbuilding - this will permit the spout to be curved without any cracking of the clay. The clay should be just a tiny bit over 1/8" thick. When a wheel-thrown spout is made, the wall section naturally tapers from the bottom to the top. To replicate this thinning of the spout wall, I use a dowel to roll a small taper into the entire spout, thinning the top 1/3 of the spout just a bit. After this secondary thinning, I again trim the spout blank with the template.
 This will help to make a more refined pouring tip possible later in the process. The template has been made by trial and error - rolling my wooden mandrel on the sheet PVC I use for patterns - and then using the side of the mandrel as a straightedge. I do make the attachment end of the spout a bit wider than the natural size of the mandrel. The template is about 10"long. The best mandrel I have was made of oak by a potter in Eugene, Dan Schmidt. I believe he went away to ceramics grad school.... correct me here, Eugene blog-followers. The Big Ceramic Store on line sells a mandrel but the proportion isn't right. I have had some made by a local woodturner that I use for my workshops.
 Using the brayer, I thin and bevel both long sides of the spout blank. This allows a neat, thin join to be made. It's good to thin and bevel in several passes, working in opposite directions and making an effort not to distort the spout blank. I like to work on a thick pad of newspaper, since I don't want any canvas texture imparted to the pieces.
 I also thin the tip of the spout a bit more with the brayer.
 Now, I score and moisten the top edge of the spout blank on the paper in front of me, taking care to not cut or damage the thinned edge with my serrated rib. When the top edge is prepared, I turn the spout blank over on its' long axis so the other long edge is at the top. I score and moisten that edge as well, so that and inside and an outside edge is prepared.
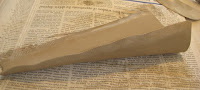 In this image you can see each edge prepared for joining.
 I lay the mandrel onto the prepared spout and begin to shape the spout to the mandrel. It must be done carefully to prevent marking the spout blank with your fingers.
 With one side conformed to the mandrel, the spout blank can now be wrapped around the mandrel, taking care to match the pouring end nicely. This takes a little practice. It's okay if your mandrel doesn't extend all the way to the tip, you can use your fingers to press the tip into a neat join. Do not cut the tip at this point or try to shape it. That can be done much more easily quite a bit later, even after the spout is placed on the teapot.
 Here's a pic of a stage in spout making where proper alignment of top and bottom edges can be seen. I don't apply any lengthwise pressure to the joint - I just sort of press with fingertips to mate the two edges.
 Here's the spout with sides all joined up. The spout can be very gently twisted to straighten the line of join. The line can be "erased" with a finger tip, but a bit dryer stage. I have always preferred to leave the line be, or even make it part of my overall design. Textured clay can also be used for spout making. In that instance, trying to remove the join line will obliterate the impressed pattern.
 In the case of this spout, I use my brass dot-roller to decorate the join.
 Now, holding the spout in both hands, carefully impart a graceful curve to the finished spout. What you see in the image is about right for the teapot bodies I will be making. You will have to experiment with your own forms. I usually make spouts the day before I make teapots, and allow them stiffen slowly. I like to put them in a plastic shoe box, cushioned in dry cleaner plastic, with the lid on tight. It is possible to join a pretty soft slab to a teapot body, but I can get a neater look with a spout that has "rested" a while.
 When the teapot body is ready, the spout will be cut with a single long stroke and joined to the body. That will be next.
 Using the brayer, I thin and bevel both long sides of the spout blank. This allows a neat, thin join to be made. It's good to thin and bevel in several passes, working in opposite directions and making an effort not to distort the spout blank. I like to work on a thick pad of newspaper, since I don't want any canvas texture imparted to the pieces.
 I also thin the tip of the spout a bit more with the brayer.
 Now, I score and moisten the top edge of the spout blank on the paper in front of me, taking care to not cut or damage the thinned edge with my serrated rib. When the top edge is prepared, I turn the spout blank over on its' long axis so the other long edge is at the top. I score and moisten that edge as well, so that and inside and an outside edge is prepared.
 In this image you can see each edge prepared for joining.
 I lay the mandrel onto the prepared spout and begin to shape the spout to the mandrel. It must be done carefully to prevent marking the spout blank with your fingers.
 With one side conformed to the mandrel, the spout blank can now be wrapped around the mandrel, taking care to match the pouring end nicely. This takes a little practice. It's okay if your mandrel doesn't extend all the way to the tip, you can use your fingers to press the tip into a neat join. Do not cut the tip at this point or try to shape it. That can be done much more easily quite a bit later, even after the spout is placed on the teapot.
 Here's a pic of a stage in spout making where proper alignment of top and bottom edges can be seen. I don't apply any lengthwise pressure to the joint - I just sort of press with fingertips to mate the two edges.
 Here's the spout with sides all joined up. The spout can be very gently twisted to straighten the line of join. The line can be "erased" with a finger tip, but a bit dryer stage. I have always preferred to leave the line be, or even make it part of my overall design. Textured clay can also be used for spout making. In that instance, trying to remove the join line will obliterate the impressed pattern.
 In the case of this spout, I use my brass dot-roller to decorate the join.
When you are decorating your spout, or looking at the join line, it's important that the joined edge end up on the upper surface of the spout. This is because the bottom of the spout will extend out further than the upper edge, and needs to be stronger and have the internal integrity of "whole clay." I sometimes even moisten and "pull" the bottom edge of the spout a tiny bit to create better pouring properties, and a traditional look.
 Now, holding the spout in both hands, carefully impart a graceful curve to the finished spout. What you see in the image is about right for the teapot bodies I will be making. You will have to experiment with your own forms. I usually make spouts the day before I make teapots, and allow them stiffen slowly. I like to put them in a plastic shoe box, cushioned in dry cleaner plastic, with the lid on tight. It is possible to join a pretty soft slab to a teapot body, but I can get a neater look with a spout that has "rested" a while.
 When the teapot body is ready, the spout will be cut with a single long stroke and joined to the body. That will be next.
Just a note about the mandrel and it's use.... most potters actually pull a hollow spout over the mandrel by twisting a cone of solid clay onto the form and pulling a hollow spout down the tapered tool. I tried about three times to do this with appalling results, gave up, and started handbuilding spouts with the mandrel as an aid. At that point in my clay career, I couldn't pull a handle either, so maybe I should try again.
I have seen Steven Hill pull a spout on a pool cue sprayed with WD-40. Pretty impressive!
Amazing blog, such great info, your work is gorgoeus! Jacqueline
ReplyDeleteI just tried this and it worked beautifully!!! Thanks....
ReplyDelete