 Here are some really big jars that are handbuilt. The shoulder and lids for these are thrown and added later.
Saturday, February 27, 2010
Some other handbuilt pottery....
Here are some really big jars that are handbuilt. The shoulder and lids for these are thrown and added later.
Tuesday, February 23, 2010
Making a Reliquary, Part 1
 This week, I am beginning an interesting new ceramic piece. I am making a latex texture mat, which has text and imagery that will be incorporated into a funereal reliquary. The reliquary will be used for the ashes of two much-loved and exceptional people, husband and wife, who requested that their remains be joined after their deaths and interred at a wild and beautiful spot on the Oregon coast. These two individuals were Floyd George Steele, and Dorothy Jane Petersen Steele, my father-in-law and mother-in-law.
The design of the imagery records their shared, lifelong appreciation of music, and F. G.'s passion for mathematics. D.J. loved plants and flowers, and enjoyed having them in her home. The names of their six children are part of the design.
The imagery will be incised into a 1/2" thick slab of white, grogless, low-fire clay. I like Seattle Pottery Supply's LF06 for this use. Like all talc bodies, it is a pain to recycle, but has many other fine properties. The slab was cut to the largest dimension that will fit into my Skutt 1227 kiln. Once the imagery is complete, the slab will be carefully dried before bisque firing to Cone 04. After firing, a 2-part latex mixture will be applied in three coats, and a mat will be lifted. This mat will be used to texture a slab for the body of a reliquary, and can then be used to create keepsake pieces for family members.
In the image at the top of the page, you can see a quilter's oval template laid out to align with a center mark on the clay. I will use this oval to define the text area, and also to inscribe consistent and correct lines in the clay.
Lettering with stamps must be done well before carving can take place. For the letter stamps to work, the clay should be fairly soft. Carving can be most easily accomplished when the clay is harder than a brick of cheese.
 I'm controlling the drying of the rest of the slab while the central lettering is taking place with plastic. These letters are available at Georgies, and are made of plastic. I prefer the metal letter stamps that are available from Tandy Leather, but I did not have the correct size for this project. I might have been able to get a better impression at a dryer clay state, but I wanted to get this project started since the drying of the slab can take a week or more. I have about three weeks to complete this project before the scheduled memorial service.
 Lettering of the central oval is complete. Now, I will dry the slab on a piece of plywood in the open air for about four hours, until it is dry enough to begin the rest of the imagery.
 I use a commonly available wire-tipped tool to incise imagery into the prepared clay. I'll take a picture of the tool I use and post it on the blog.
The floral imagery I use is part wild rose, part dogwood, and part magnolia. My own mother used a similar generic flower in her textile painting and other handcrafts, which I loved to observe in process as a child.
 Here's the slab after three or four hours of pattern application. All this imagery will be refined again at a drier state. From here to bisque firing, I will cure the slab in such a way that both sides loose moisture evenly and equally. This will prevent warping during the drying process.
 The finished slab is ready to be dried between layers of gypsum board. Every day, I will uncover it and have a look at it, and rework lines and letters until I am satisfied with the surface. When the slab begins to change color, I will dry it on a wire shelf so air can reach each side simultaneously. Subsequent blog posts will show the making of the mat, and the creation of the funerary vessel.
Thursday, February 18, 2010
Step 9 - Finishing the Handle
 Here's where we left off in the last post, just having gently pressed the new, soft handle onto the scored spot that was prepared before the handle pulling started. The handle is very tender at this point, and it's easy to deform it with a careless gesture.
 You can see the handle extending past the bottom of the cup. I let the handle form a bond to the cup while I do a little refining with a small sponge at the top attachment.
 I have pinched off all but about an inch of the extra clay at the bottom of the handle. This will be enough to make the little bunp that I like at the base of my handles.
  I form the little bump by folding one side of the the extra handle stock to the middle, and then folding the other side over it. I fiddle around with my finger until I get it like I want it.
 This cup handle is related to handles that I have seen on early American pewter cups and pitchers. I feel that the little bump at the bottom balances out the volume of the curve at the top of the handle, and makes visual sense to me.
 I dry these cups right side up. If you invert the cup, the handle will dry faster than the cup and be in danger of cracking off. In summer, I cover them with plastic for a couple of days so handle and cup can slowly dry together.
Step 8 - Pulling the Handle
 Here, I am holding the cup with its' handle stub attached perpendicular to the floor. What you can't see is that my right hand is in a container of water. First, I use my wet thumb to refine the join area at what will be the top of the handle. Then, I dip my hand in water, and then begin to stroke and smooth the handle blank. I am not pulling it downward- that will happen as the blank is wetted and smoothed. The hand doesn't want to make a symmetrical handle - it isn't a symmetrical apparatus itself - so differential pressure will have to be used to each surface of the handle. I really don't know how to describe that... you will have to experiment. This does take practice - I started really understanding how to do it after a long workshop with Ellen Shankin, where many, many handles were attached. Before beginning to work the handle, I wet and scored an area at the base of the cup where the handle tail will be attached. I did this to create a target for placement, as well as to strengthen the eventual join there.
 Now, you can see that how the handle has lengthened and thinned as I have smoothed and shaped it with my wet hand. At this point, you can add a groove with your thumb if you like that look. Don't be afraid to experiment! I almost always have an inch or two of clay to pinch off at the end. If you should need to reattach a new handle stub, scrape the top of the cup smooth and set it aside for a little while. The cup clay with be softened from the first attachment, and it will need to stiffen a bit. If the handle stub has been properly prepared, this shouldn't happen.
 Here's the cup and handle ready to finish. You can see the nice taper that has been created by the wetting and smoothing process. There is also a taper in the other plane, but I didn't think to take a picture of it. Please note that the cup has been held parallel to the floor throughout this entire process. I find that this makes a smooth and attractive attachment point much easier to make.
 Hold of the tail of your handle and give it a small tug to pull the handle down to the point of attachment. I score the bottom of the cup where the attachment will be made before I begin to wet and smooth the handle. Take special care that your handle is attached straight down - parallel to the long axis of the cup. I still have to really concentrate on this to make it right. The handle is pretty wet and weak at this point, and cannot be taken loose and moved, unless there is a lot of clay still in it that can be pulled down in a second effort.
 Press the soft tail of the handle carefully onto the scored clay at the point of attachment. Finishing the handle will continue in the next post.
Friday, February 12, 2010
Step 7 - Attaching the Handle
 I can hear the groans about pulled handles resounding through cyberspace. Potters, this can be learned easily with practice.
Start with some nice, fresh clay - not reclaim. Roll out a fat coil about 1.25" in diameter for these big mugs. If your clay starts to flatten out, twist each end in opposite directions and it will roll round again.
 Now, working from both sides, firmly pat the coil into a flattened elipse. You can see the section that we want in this image... this is the general shape of the cup handle that I want on a mug like the ones we have been making.
 With the serrated rib, score deeply into an area about 1" x 1-3/4" just to the right of the vertical join. You don't want it sloppy wet - just scraped up a bit. If your cup, or any piece upon which that you wish to pull a handle, has begun to dry at the top and is changing color, do not attempt to pull a handle. You will have cracking! The cup will have already begun to shrink, and when the handle starts to shrink as it dries, it will pop right off. Be especially careful in summer....
 Take your handle blank in your left hand (sorry, Lefties, you'll have to reverse a lot of this) and working from the center out with short strokes, score the handle attachment plane. A nice bead of worked clay will extend over each edge if you do it right.I have just pushed the handles onto the cup bodies in the picture below. Handles WANT to stick to the cup! I can't emphasize enough how important it is to have both cup and handle at similar stages of drying is for this process to work right.
 Use the tip of your finger to smooth the join where the handle meets the cup. The extra goo that was scuffed up with the rib makes it really easy. I like to set cups aside for at least 5-8 minutes so the attachment can develop.
The handles appear to be too large, but we want a nice, large base of attachement.
 Here's the handle all ready to be pulled into it's final form.
Thursday, February 11, 2010
Step 6 - Measuring and Attaching the Bottom
I have a set of nifty little round cutters - Ateco brand - that I purchased at a cookware store in Portland. I'm sure you could get them on the net.... I pick out a likely one and check it against the diameter of the cup, and then cut a clay bottom for my cylinder with it.
Before I had the cutters, I had a small collection of round things that I used as templates; mostly jar lids and lids from plastic containers. You can easily size slab for a specific template diameter by measuring around the circular object with a tape measure. The measurement is usually about 1/4" longer than the slab needs to be. A little patience with the trial and error process will yield a nice fit, just be sure to jot down what slab size is required for a particular circular template.

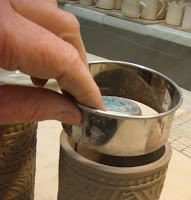

Now, moisten and score both the bottom of the cylinder and edges of the circular bottom with a serrated rib. It's good to have a close fit, but if the bottom is a bit large be sure that the cylinder is centered on it. After the bottom begins to adhere, flip the cylinder, which I guess is now a cup, over. You can gently move the cup around as needed to center, or adjust the edges. It will slide on the film of water for a few minutes after it is set on the bottom.
I usually attach the bottom with the cup upside down. You can see the neatly fitting bottom ready to become part of the cup below. Just a little smoothing with the finger, and perhaps a careful sponging with a little piece of sponge is all that is needed to finish the bottom.


Just a swipe with the finger
is enough to seal the seam.

A tool can be used to firm the
vertical join.

Now, the finished cup can be set aside to stiffen in preparation for pulling a handle. If the top rim is firm and level, the cup can be turned upside down. If it is soft, cover the cup with plastic so the mug can firm up slowly. I often pull handles on hand-built mugs the day after I form them.
Before I had the cutters, I had a small collection of round things that I used as templates; mostly jar lids and lids from plastic containers. You can easily size slab for a specific template diameter by measuring around the circular object with a tape measure. The measurement is usually about 1/4" longer than the slab needs to be. A little patience with the trial and error process will yield a nice fit, just be sure to jot down what slab size is required for a particular circular template.


Now, moisten and score both the bottom of the cylinder and edges of the circular bottom with a serrated rib. It's good to have a close fit, but if the bottom is a bit large be sure that the cylinder is centered on it. After the bottom begins to adhere, flip the cylinder, which I guess is now a cup, over. You can gently move the cup around as needed to center, or adjust the edges. It will slide on the film of water for a few minutes after it is set on the bottom.
I usually attach the bottom with the cup upside down. You can see the neatly fitting bottom ready to become part of the cup below. Just a little smoothing with the finger, and perhaps a careful sponging with a little piece of sponge is all that is needed to finish the bottom.


Just a swipe with the finger
is enough to seal the seam.

A tool can be used to firm the
vertical join.

Now, the finished cup can be set aside to stiffen in preparation for pulling a handle. If the top rim is firm and level, the cup can be turned upside down. If it is soft, cover the cup with plastic so the mug can firm up slowly. I often pull handles on hand-built mugs the day after I form them.
Step 5 - Making a Cylinder from the Cup Blank
I use a section of paper mailing tube to "train" the cup blank to be round. I don't wrap the blank around the mailing tube, I drape it over the tube in a horizontal position. I support the tube with my left hand, and with my right hand press the slab to conform to the curve of the tube. It's important that each of the sides is pressed into the form of the tube.
When you have curved the entire piece, set the tube and curved blank down on what will be the bottom edge of the cup. The top will have a nice rounded rim, while the bottom will still have square edges. Slip the tube out of the cylinder and set it aside. Position the left side of the cup blank, which has scoring on its' outer edge under the right side of the cup blank, which has scoring on its' inner surface. The cylinder should be sitting level, and the tops of each side should be level, or close to it. Gently press them together, and let the clay surfaces adhere for a few minutes before smoothing the join further. Just your finger will do at this point, a tool can be used to finish the join more completely when the piece is at a dryer state. The tube can be reinserted into the cylinder and used to resist pressure from your fingers, or the brayer. Be gentle and don't deform the join - the clay has a will to stick to itself....


When you have curved the entire piece, set the tube and curved blank down on what will be the bottom edge of the cup. The top will have a nice rounded rim, while the bottom will still have square edges. Slip the tube out of the cylinder and set it aside. Position the left side of the cup blank, which has scoring on its' outer edge under the right side of the cup blank, which has scoring on its' inner surface. The cylinder should be sitting level, and the tops of each side should be level, or close to it. Gently press them together, and let the clay surfaces adhere for a few minutes before smoothing the join further. Just your finger will do at this point, a tool can be used to finish the join more completely when the piece is at a dryer state. The tube can be reinserted into the cylinder and used to resist pressure from your fingers, or the brayer. Be gentle and don't deform the join - the clay has a will to stick to itself....


Subscribe to:
Posts (Atom)