 I've fired my salt kiln 77 times in the past five years. I thought in the early years that I might get 100 firings, but the condition of the kiln is beginning to concern me and it's clear that it's time to rebuild the kiln. This has been a problem kiln since I first completed it - lots of desire for the salt process but not enough knowledge to build the kiln properly. Basically, there's just too much hard brick in the kiln. There were a lot of stalled firings in the first year, and then I kinda got it figured out and was able to get it to Cone 10 in about 14 hours. Those were the good days.... sigh. But then, I changed propane suppliers and they changed the regulator on the tank, and a frustrating period began with terrible long firings that barely reached temperature. There was a lot of BAD SCIENCE on my part - and my need for work for shows and galleries kept me from doing anything serious to remedy the situation.
I might have gotten my 100 firings if it hadn't been for the many long stalls, hours and hours over 2000 F with temperature barely creeping up. You can see how damaged these bricks in the right rear of the kiln have become.
 The skews in the arch are also deteriorating badly. I have been researching how much of the brick in my kiln can be reused - and I will be carefully evaluating each brick before I reuse it.
 The skews in the arch are also deteriorating badly. I have been researching how much of the brick in my kiln can be reused - and I will be carefully evaluating each brick before I reuse it.
With new hard brick up around $7-8 each, I'd like to reuse as much as possible. I think that I will have to buy all new skews - they don't look good.
 The kiln has steel angle iron edge pieces, but I am definitely going to use a wider stock in the new kiln. I am also going to offset the chimney so that a threaded rod can hold the back in compression at midpoint. You can see the rear burner pot - I will probably still have two opposed burners. I now have some really nice Buzzer burners that will be great for the new kiln.
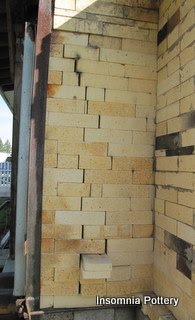 You can see gaps between the bricks from movement of the kiln during firing. This is the left rear corner of the kiln, seen from behind. As you can see, there's some decent looking hardbrick on the outside of the kiln that should be reusable.
 This is the middle of the left side of the kiln. In the first year or when I was really struggling to get temperature, I added a layer of kaowool insulation to each side under an aluminum panel. This location has had a lot of vapor escape, and it has really eaten up the angle iron reinforcement, and just plain dissolved the aluminum panel.
 Here's another vapor leak on the other side. The kaowool is completely gone from that spot, it will be interesting to see what's under there.
I'm going to have some help with this project; a couple of guys who work with me are going to take the kiln down. I will sort and grind the brick... ooohhh! can't wait.
I'll post some more pix as I proceed, gotta have pots for Showcase!